If you are just joining us, I am working on a series to learn about Dynamics 365 and Customer Insights using superheroes! You can check out the full series on the Hero Insights page. Enjoy!
Previously in our adventure, we set up our data to be in Dynamics 365 / CDS and we have a Customer Insights trial so now we are going to add some data!
Connect to The Common Data Service
Our primary data is inside the Common Data Service (CDS) so we will connect to that first. It is fortunately very simple to connect to the environment and choose entities. We do not need to worry about which fields we need yet, that step will happen when we start mapping and merging the data.
In the Data > Data Sources area select “Add Data Source”Select “Connect to a Common Data Service”Give your Data Source a name. This will be used throughout the tool so make sure it is recognizable and keep all your data sources unique and descriptive.Enter the link for your Dynamics 365 environment and sign in.When you sign in, you will need to grant access for Customer Insights to access Dynamics 365.Now that you are signed in, you can click Next.Choose the Entities needed in Customer Insights. In our case, we are only interested in Account and Contact. We will choose specific fields later.We can now see that CDS has been added as a Data Source and the data is being pulled into Customer Insights.
Next Data Source
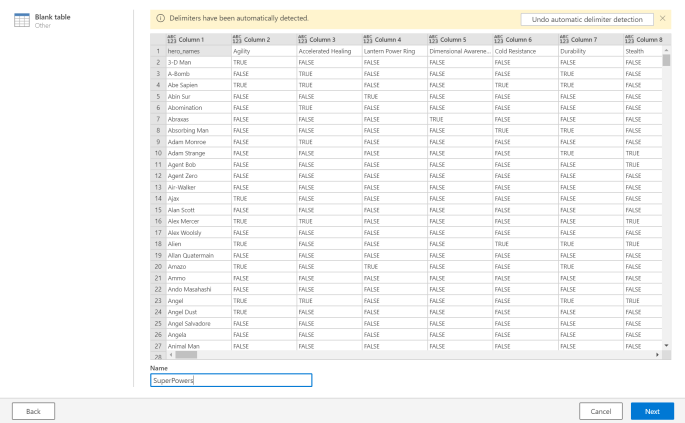
For our next data source, we are going to add the Super Powers from the Super Heroes Dataset. To import, I used the Blank Table data source. I chose this as this data is not going to be continually updated. Basically, you just copy the data into the table and then do a few transformations to prepare the data to be digested by Customer Insights.
TIP
Learn from my mistakes! Your column headers will become attribute names and these cannot contain spaces or special characters (except underscore). In the data set that I used, I needed to remove spaces, – and /. This can be done as part of the Customer Insights transformations if needed but is much faster if you review the source file in Excel first.
Let’s import additional data. Choose Next.You will be asked to enter a name for this data source, just remember to ensure you can understand and differentiate the name from your other data sources. Then we will choose the Blank Table Data Source.Give this table a name and paste your data in. Simply select the Blank Table and Paste. We will deal with formatting and data issues in the next page.We are now performing transformations on the data. If this data source would be continuously updated, these transformations would be applied each time.
On the Transform tab, select “Use first row as headers”. These headers will be the attribute names for those fields.All of the transformations you perform are listed on the left-hand side. You can quickly delete steps if you make a mistake.We can choose the data types for these columns (soon-to-be attributes). This becomes very important later when we start to merge data as you can only merge data of the same type.We also want to create a key for this table. I am going to select the hero name and Mark as Key (Transform tab). For this data, we know the names should be unique and consistent between data sets. Since that is not usually the case, there probably needs to be some additional discussion around this.As previously stated, do as I say not as I do. Before pasting your data into the Blank Table, please review your headers to remove spaces and special characters. This will save you from repeating this process several times. (Unrelated side note: it’s probably best if you don’t look too closely at my screenshots.)
Adding More Data Sources
We are going to add two more data sources using the Blank table option – Complete Superhero Dataset and Marvel Comic Wiki. There are a few steps we will do for both of these files:
Ensure we clean up column headers before dropping into the Blank Table Data Source to remove spaces and special character
Remove columns we don’t want to use (this could be done in Excel or as part of the transformations in Customer Insights)
Update our column data types such as setting Power Stats to whole numbers
Mark the Hero name as the key for each data source
In one of these files, there was a name field that was formatted like “Spider-Man (Peter Parker)”. To break this up, we can use transformations again! Of course, our Excel wizards could do this in the original file but the benefit of transformations is that the change would be automatically applied to new data. Plus this helps towards our goal of learning more about Customer Insights!
I chose to edit this field using the Split Cells operation on the Transformation tab. We can choose our delimiter to use the formatting of our data.Now our data is split between two columns but we have an extra ) character. So I used the Extract > Text before delimiter to just remove the last character (the delimiter is “)”).Now you can see that our “name” field has been parsed out into it’s component parts. Keep in mind that the Split Cells Operation does not keep the original field name but you can duplicate the column (like I did) if you want to keep the before and after values.
Are we there yet?
We have been making pretty good progress. Let’s look at our data sources.
We have all our data sources looking good.
So is our data ready to go?
We are not quite ready to get to the insights. Next we will look at Mapping, Matching and Merging.
We made it through alot today but join us next time to learn about unifying. Is it better to Map, Match, or Merge? What’s even the difference between the three? Find out these questions and more during tomorrow’s post!
One thought on “Hero Insights: Adding Data Sources to Customer Insights”


One thought on “Hero Insights: Adding Data Sources to Customer Insights”